Malayalam typing on a Amazon fire tablet

I did the following steps to enable typing in English and transliterating the typed words to Malayalam on a Fire tablet. I have tried these steps on a Fire 10 2023 tablet, which runs a modified version of the Android operating system. I also used an external Bluetooth connected Arteck keyboard with the fire tablet which makes typing long sentences / paragraphs easier on a tablet.

First you would want to enable the Google play store on your fire tablet (By default only the Amazon app store is enabled, which is limited as to the apps you can download and install). The instructions can be found at https://www.androidpolice.com/install-play-store-amazon-fire-tablet/

From the Google play app store, search for the app named “Gboard” and install it.

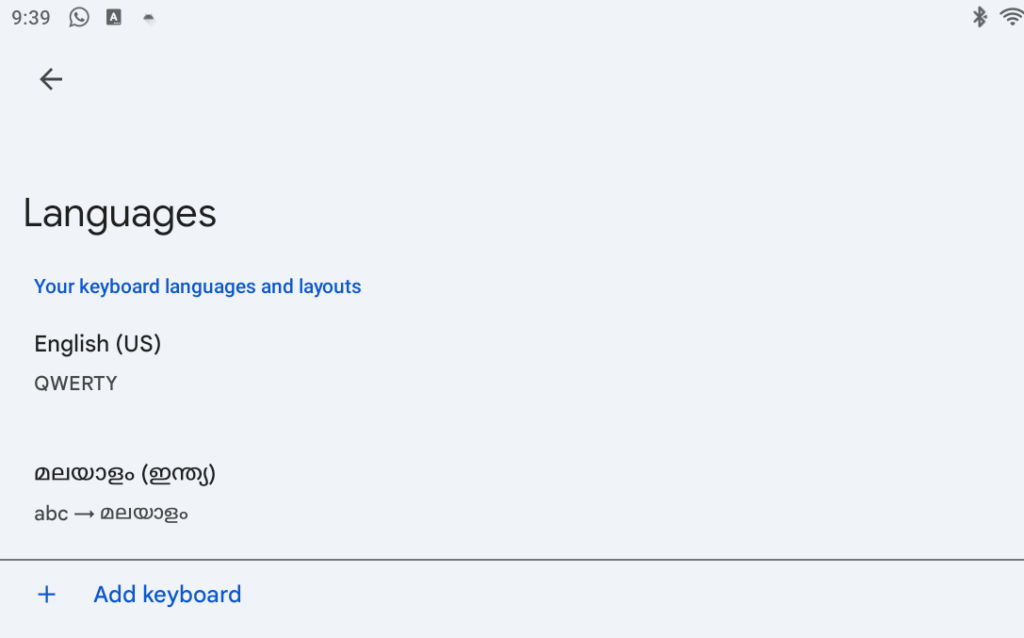
In the settings for Gboard enable the Malayalam keyboard.
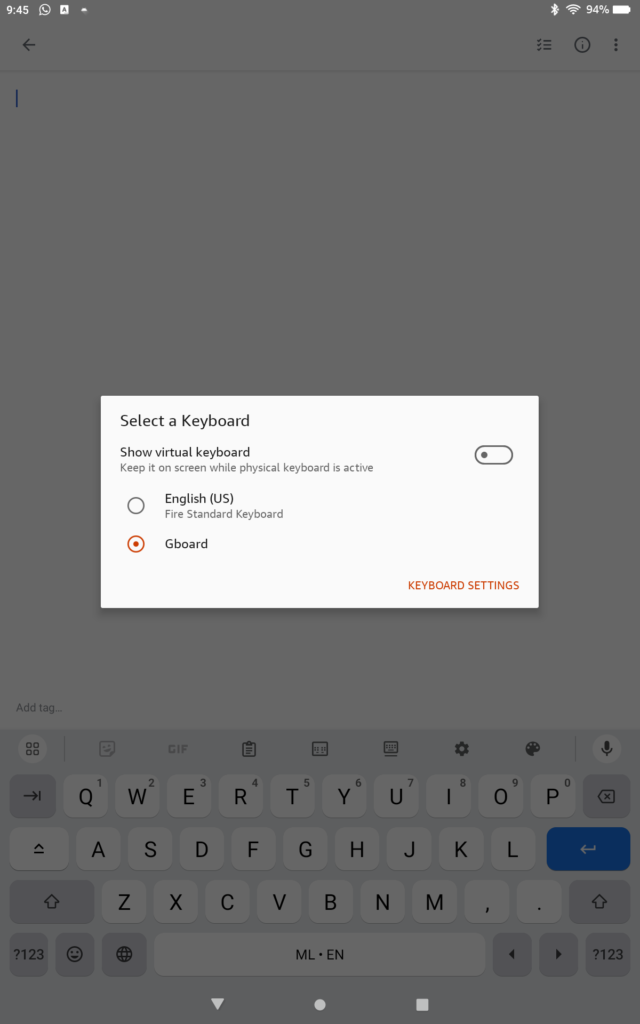
Now you are ready to type in Malayalam. When you are in an application like Whatsapp, and you want to type in Malayalam, you can click on the keyboard button and choose the keyboard you want to use . Make sure you choose the Gboard keyboard.
On the keyboard you will see a globe image, click on that and you will see the space bar indicate MLEN.
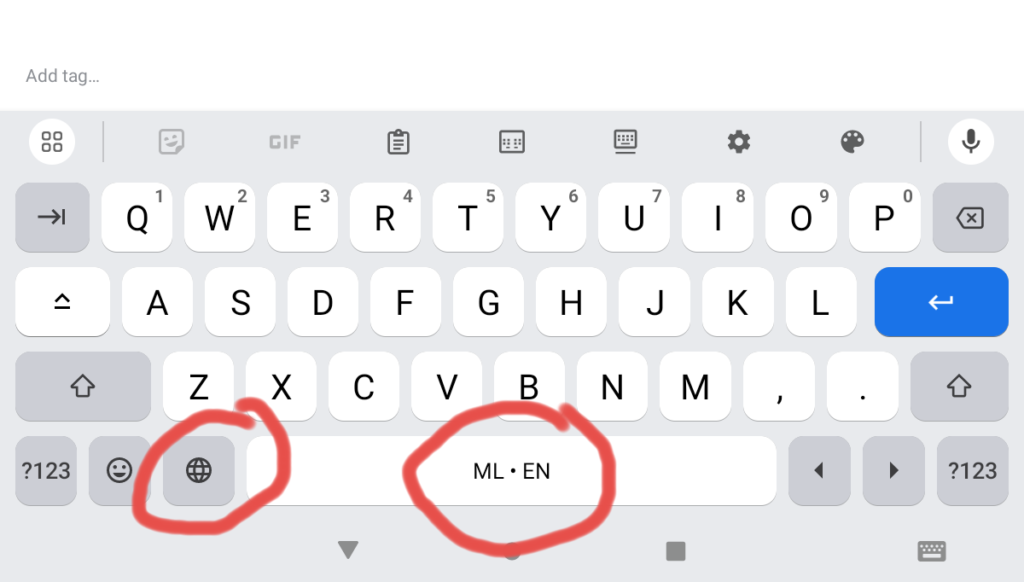
Then whatever you type in English will be converted to Malayalam. ഇത് പോലെ….

Upgrade your wordpress software

If you run your blog using wordpress software, then please be aware that there is a wordpress worm going around, that can

This particular worm, like many before it, is clever: it registers a user, uses a security bug (fixed earlier in the year) to allow evaluated code to be executed through the permalink structure, makes itself an admin, then uses JavaScript to hide itself when you look at users page, attempts to clean up after itself, then goes quiet so you never notice while it inserts hidden spam and malware into your old posts.

Holy cow, who thinks up this stuff…

Check if your blog is infected.

Upgrade your blog software to wordpress 2.8.4, which takes care of the vulnarabilities that this worm exploits.

Hosting the blog

Yesterday I moved this blog to godaddy.com’s hosting services. They already were my domain name registrar, and their rates were pretty good, so instead of having to go through the hassles of transferring the domain name and such (sure I could have kept the domain name where it is and just redirected it to the new hosting service) i decided to give godaddy.com’s hosting service.

Even though i started the blog on a computer at my home, the noise from the computer was annoying, and the prospect of keeping it On all the time, and its power consumption were key in the decision to get it hosted. Costs me 50$ a year as opposed to just the power bills while it was hosted at home.

Of course it was a no brainer to choose linux based hosting, and i was pleasently surprised by the ease of use of setting up the whole thing.

Once I bought the hosting plan
– I followed the “Getting started with Linux shared hosting” http://help.godaddy.com/article/1361 guide from go daddy to set things up.
– First I setup the hosting account. This gives you the linux userid and the password of your choice to access your hosting account.
– I find this annoying that I cannot get shell access (ssh), i can only get ftp access.
– Next I setup the DNS servers. When you create the hosting account, you get an IP address for the host.Since my domain is hosted by godaddy themselves, i just had to update the dns servers to reflect the current DNS servers for godaddy.
– Then I had to wait for approximately 3 hours (The doc warns you that this could take a while) for all the DNS servers (especially the one used by my ISP) to get updated with the proper name resolution for my domain name to the new hosting server.
– To install and configure the wordpress blog you simply go to the “Manage Account” URl and then choose “Your Applications”, you can choose to install wordpress and it walks you through a wizard to configure the mysql database and other wordpress settings.
– That was all and the blog was up and running.
– Since I had only about 9 posts on my original blog hosted at Home I copied and pasted all of the content to the new blog.
– It is also impressive that you can backup your mysql database using phpmysqladmin (You can store away the backup on your home PC), and you can use ftp to backup your php installation.

All in all I am impressed by the self-service style/error free setup.

How to install the wordpress stats plugin for your blog

This plugin gives you access to the same useful stats that the blog users at wordpress.com get. Stuff like number of times a page was accessed.

  • Download the wp-stats plugin from wordpress from http://wordpress.org/extend/plugins/stats/
  • unzip the file and cp stats.php to /<wordpresshome>/wp-content/plugins/.
  • Edit the plugin and replace the line

$stats_wpcom_api_key = ”;
with
$stats_wpcom_api_key = ‘yourwordpressapikey’; (You can signup at wordpress.com to get you an API key)